
This tutorial was written by Charlotte/CharRose (Formerly known as Redrose). This may not be reproduced. Do not copy and pass the tutorial I have written around groups. You may link to it and if there are any issues with the tutorial Let me know on site or Private message me. All images and examples were made by Charlotte/CharRose and are NOT to be snagged or used anywhere else. Any resemblance to another tutorial is purely coincidental.
Written on May 9, 2009

For this tutorial you will need
Psp and a working knowledge of it
Mask (included in supplies if this is yours please let me know so I can credit you.)
Image of choice or one in my supplies. The one in my supplies is not the one I used because I can not find the one I used but I have provided you one it is from www.sxc.hu/ .
Tube of your choice. The one I used I can not provide as it is licensed thru CILM and copyright Michael Landefeld.
Remember when crediting on the tag to use the copyright for the artist. If you need to credit the photo taker you put Photo by.......
You will also need the Tramages plugin This is included in the supplies.
Download supplies here
Before we start on the tag Make sure you have your mask either installed or open but minimized in psp, Make sure you have unzipped and put your tramages plugin in your plugin folder, have your image open and minimized for now.
Ok so are we ready???
Lets begin
Written on May 9, 2009
For this tutorial you will need
Psp and a working knowledge of it
Mask (included in supplies if this is yours please let me know so I can credit you.)
Image of choice or one in my supplies. The one in my supplies is not the one I used because I can not find the one I used but I have provided you one it is from www.sxc.hu/ .
Tube of your choice. The one I used I can not provide as it is licensed thru CILM and copyright Michael Landefeld.
Remember when crediting on the tag to use the copyright for the artist. If you need to credit the photo taker you put Photo by.......
You will also need the Tramages plugin This is included in the supplies.
Download supplies here
Before we start on the tag Make sure you have your mask either installed or open but minimized in psp, Make sure you have unzipped and put your tramages plugin in your plugin folder, have your image open and minimized for now.
Ok so are we ready???
Lets begin
---------------------------------------------------------------------------
Open a new image 450 by 404 Transparent background
Choose a color from your tube and than floodfill your blank image.
Go to Layers-New mask layer-From image
Choose the Bflyflbymask18 (Source luminance selected and Invert mask data)
Merge your mask group.
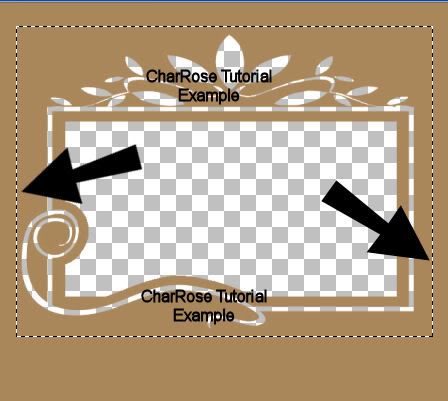
Choose your selection tool
Draw a selection around the outer mask edge to where the transparent part shows up.
See below example.
Add a new layer under your mask layer.
On your photo right click and copy
Back on your image make sure the new blank layer is highlighted
Than right click and Paste-Paste into selection.
Select none.
On your mask layer
Go to Effects-Plugins-Tramages-Tow the line with below settings
Control 0: 63
Control 1: 54
Control 2: 48
Control 3: 9
Select ok
Add your tube to the right and a dropshadow of choice.
Add your copyrights
Add your name
Save and you are done.
Choose a color from your tube and than floodfill your blank image.
Go to Layers-New mask layer-From image
Choose the Bflyflbymask18 (Source luminance selected and Invert mask data)
Merge your mask group.
Choose your selection tool
Draw a selection around the outer mask edge to where the transparent part shows up.
See below example.
Add a new layer under your mask layer.
On your photo right click and copy
Back on your image make sure the new blank layer is highlighted
Than right click and Paste-Paste into selection.
Select none.
On your mask layer
Go to Effects-Plugins-Tramages-Tow the line with below settings
Control 0: 63
Control 1: 54
Control 2: 48
Control 3: 9
Select ok
Add your tube to the right and a dropshadow of choice.
Add your copyrights
Add your name
Save and you are done.
That was pretty easy huh??? I would love to see what you do if you do my tutorial.
No comments:
Post a Comment